티스토리 뷰
지난 글까지 테스트의 종류를 알아보고, 가장 작은 범위인 단위 테스트를 비즈니스 로직에 적용해 봤다.
2022.09.07 - [개발/Spring] - [Spring]단위 테스트(Unit Test)
2022.09.07 - [개발/Spring] - [Spring]JUnit을 이용한 비즈니스 로직 단위 테스트
2022.09.08 - [개발/Spring] - [Spring]Hamcrest를 적용한 단위 테스트
[Spring]JUnit을 이용한 비즈니스 로직 단위테스트
지난 글에선 테스트의 종류와 단위 테스트, JUnit 없는 단위 테스트 구현을 살펴보았다. 2022.09.07 - [개발/Spring] - [Spring]단위 테스트(Unit Test) [Spring]단위 테스트(Unit Test) 지난 글까진 만들어진 애..
gnidinger.tistory.com
이번 글부터는 다음으로 큰 범위인 Slice Test에 대해 알아볼텐데,
먼저 테스트의 종류에 대해 복습하고 가자.

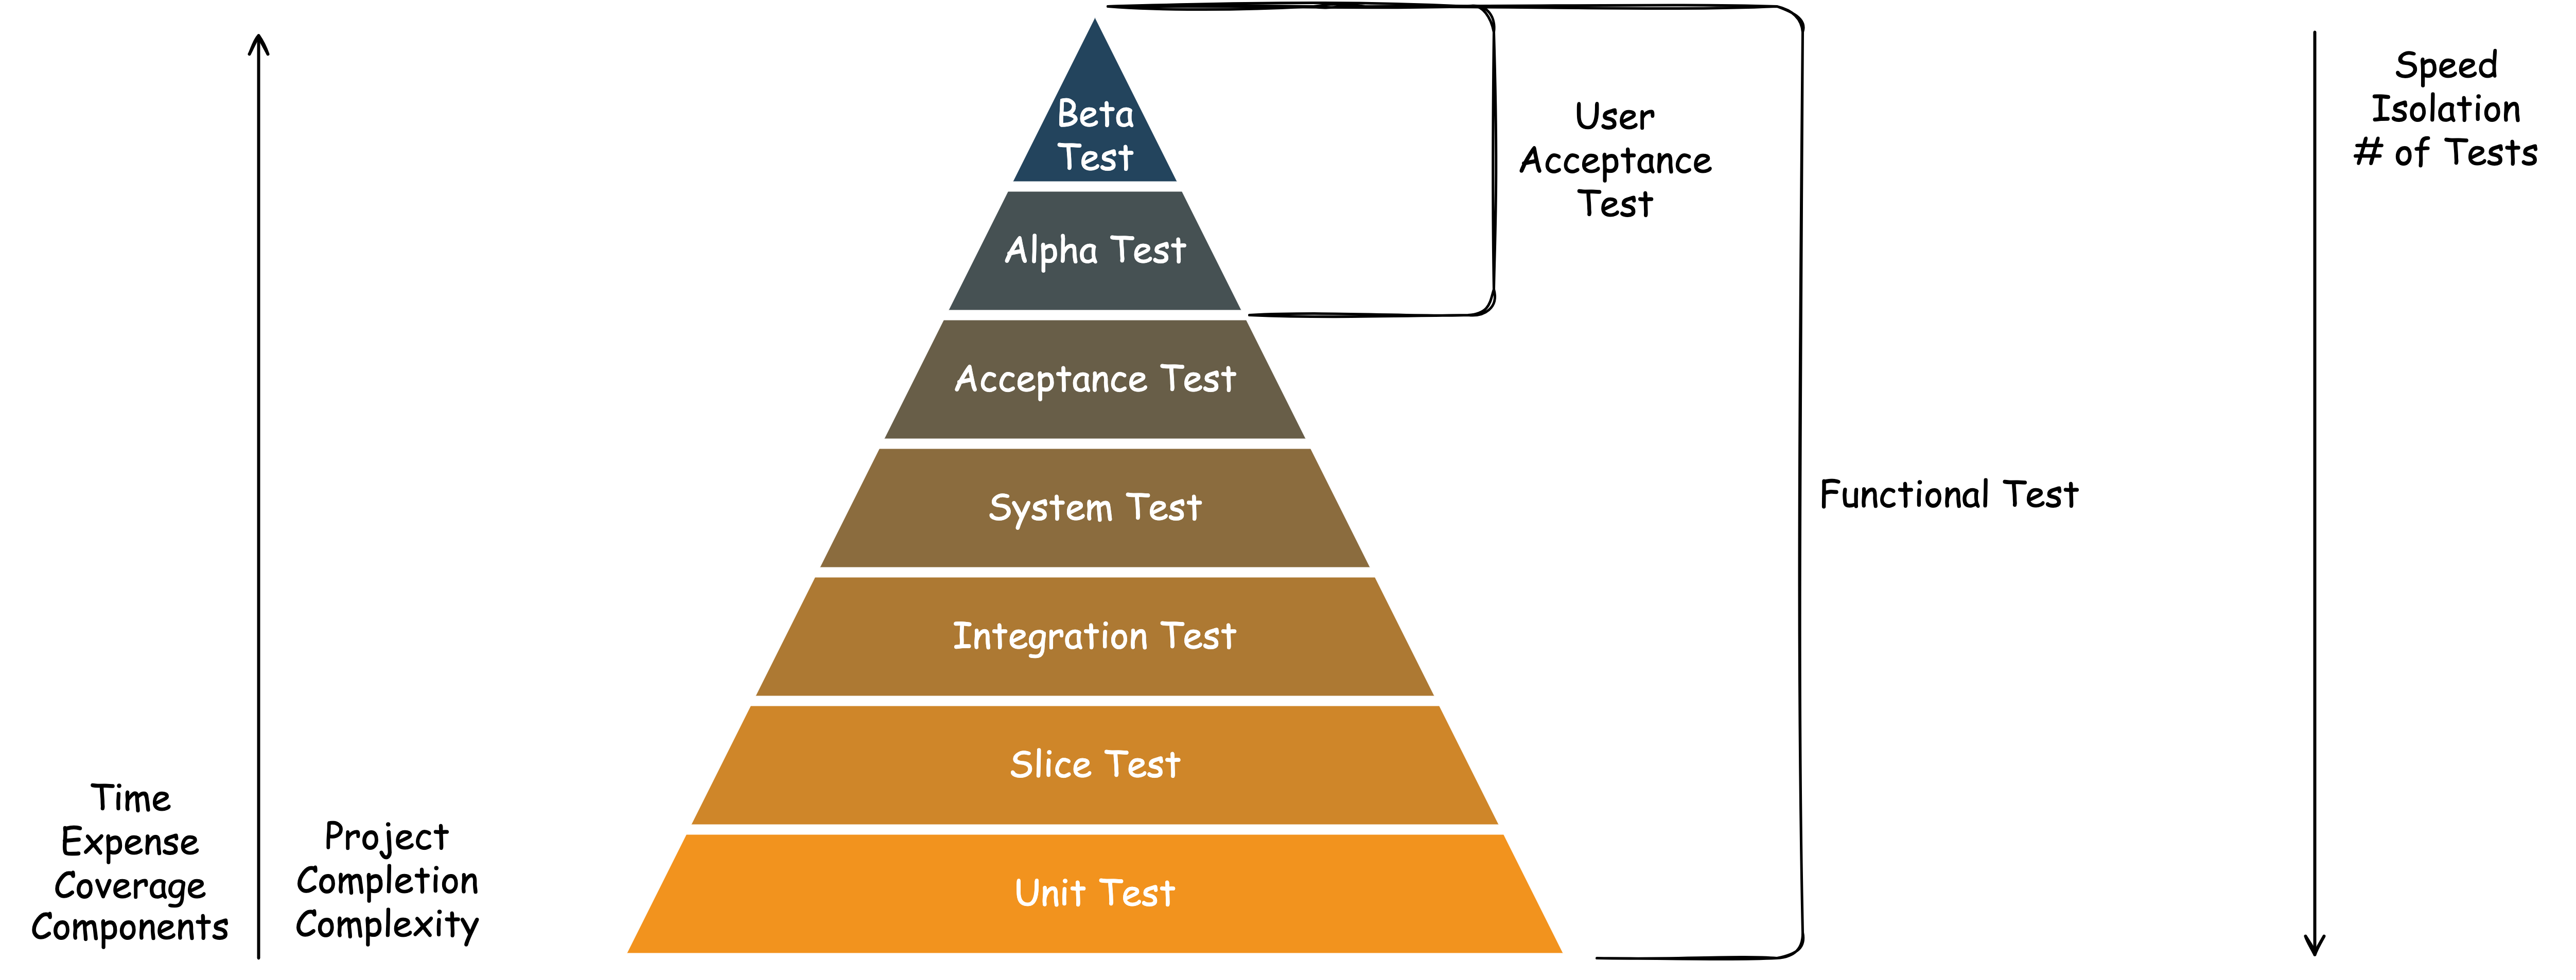
테스트란 한 마디로 말하면 일정 기준을 정한 뒤 특정 대상이 그것을 충족시키는지 아닌지를 검증하는 과정이다.
소프트웨어 테스트는 시간 순서에 따라 대략 위 그림과 같이 구분할 수 있으며,
그래프의 위로 갈수록 드는 시간과 돈, 다루는 컴포넌트의 개수가 늘어나는 것을 확인할 수 있다.
이번 시간에 알아볼 Slice Test는 아래에서 두 번째에 위치하는데,
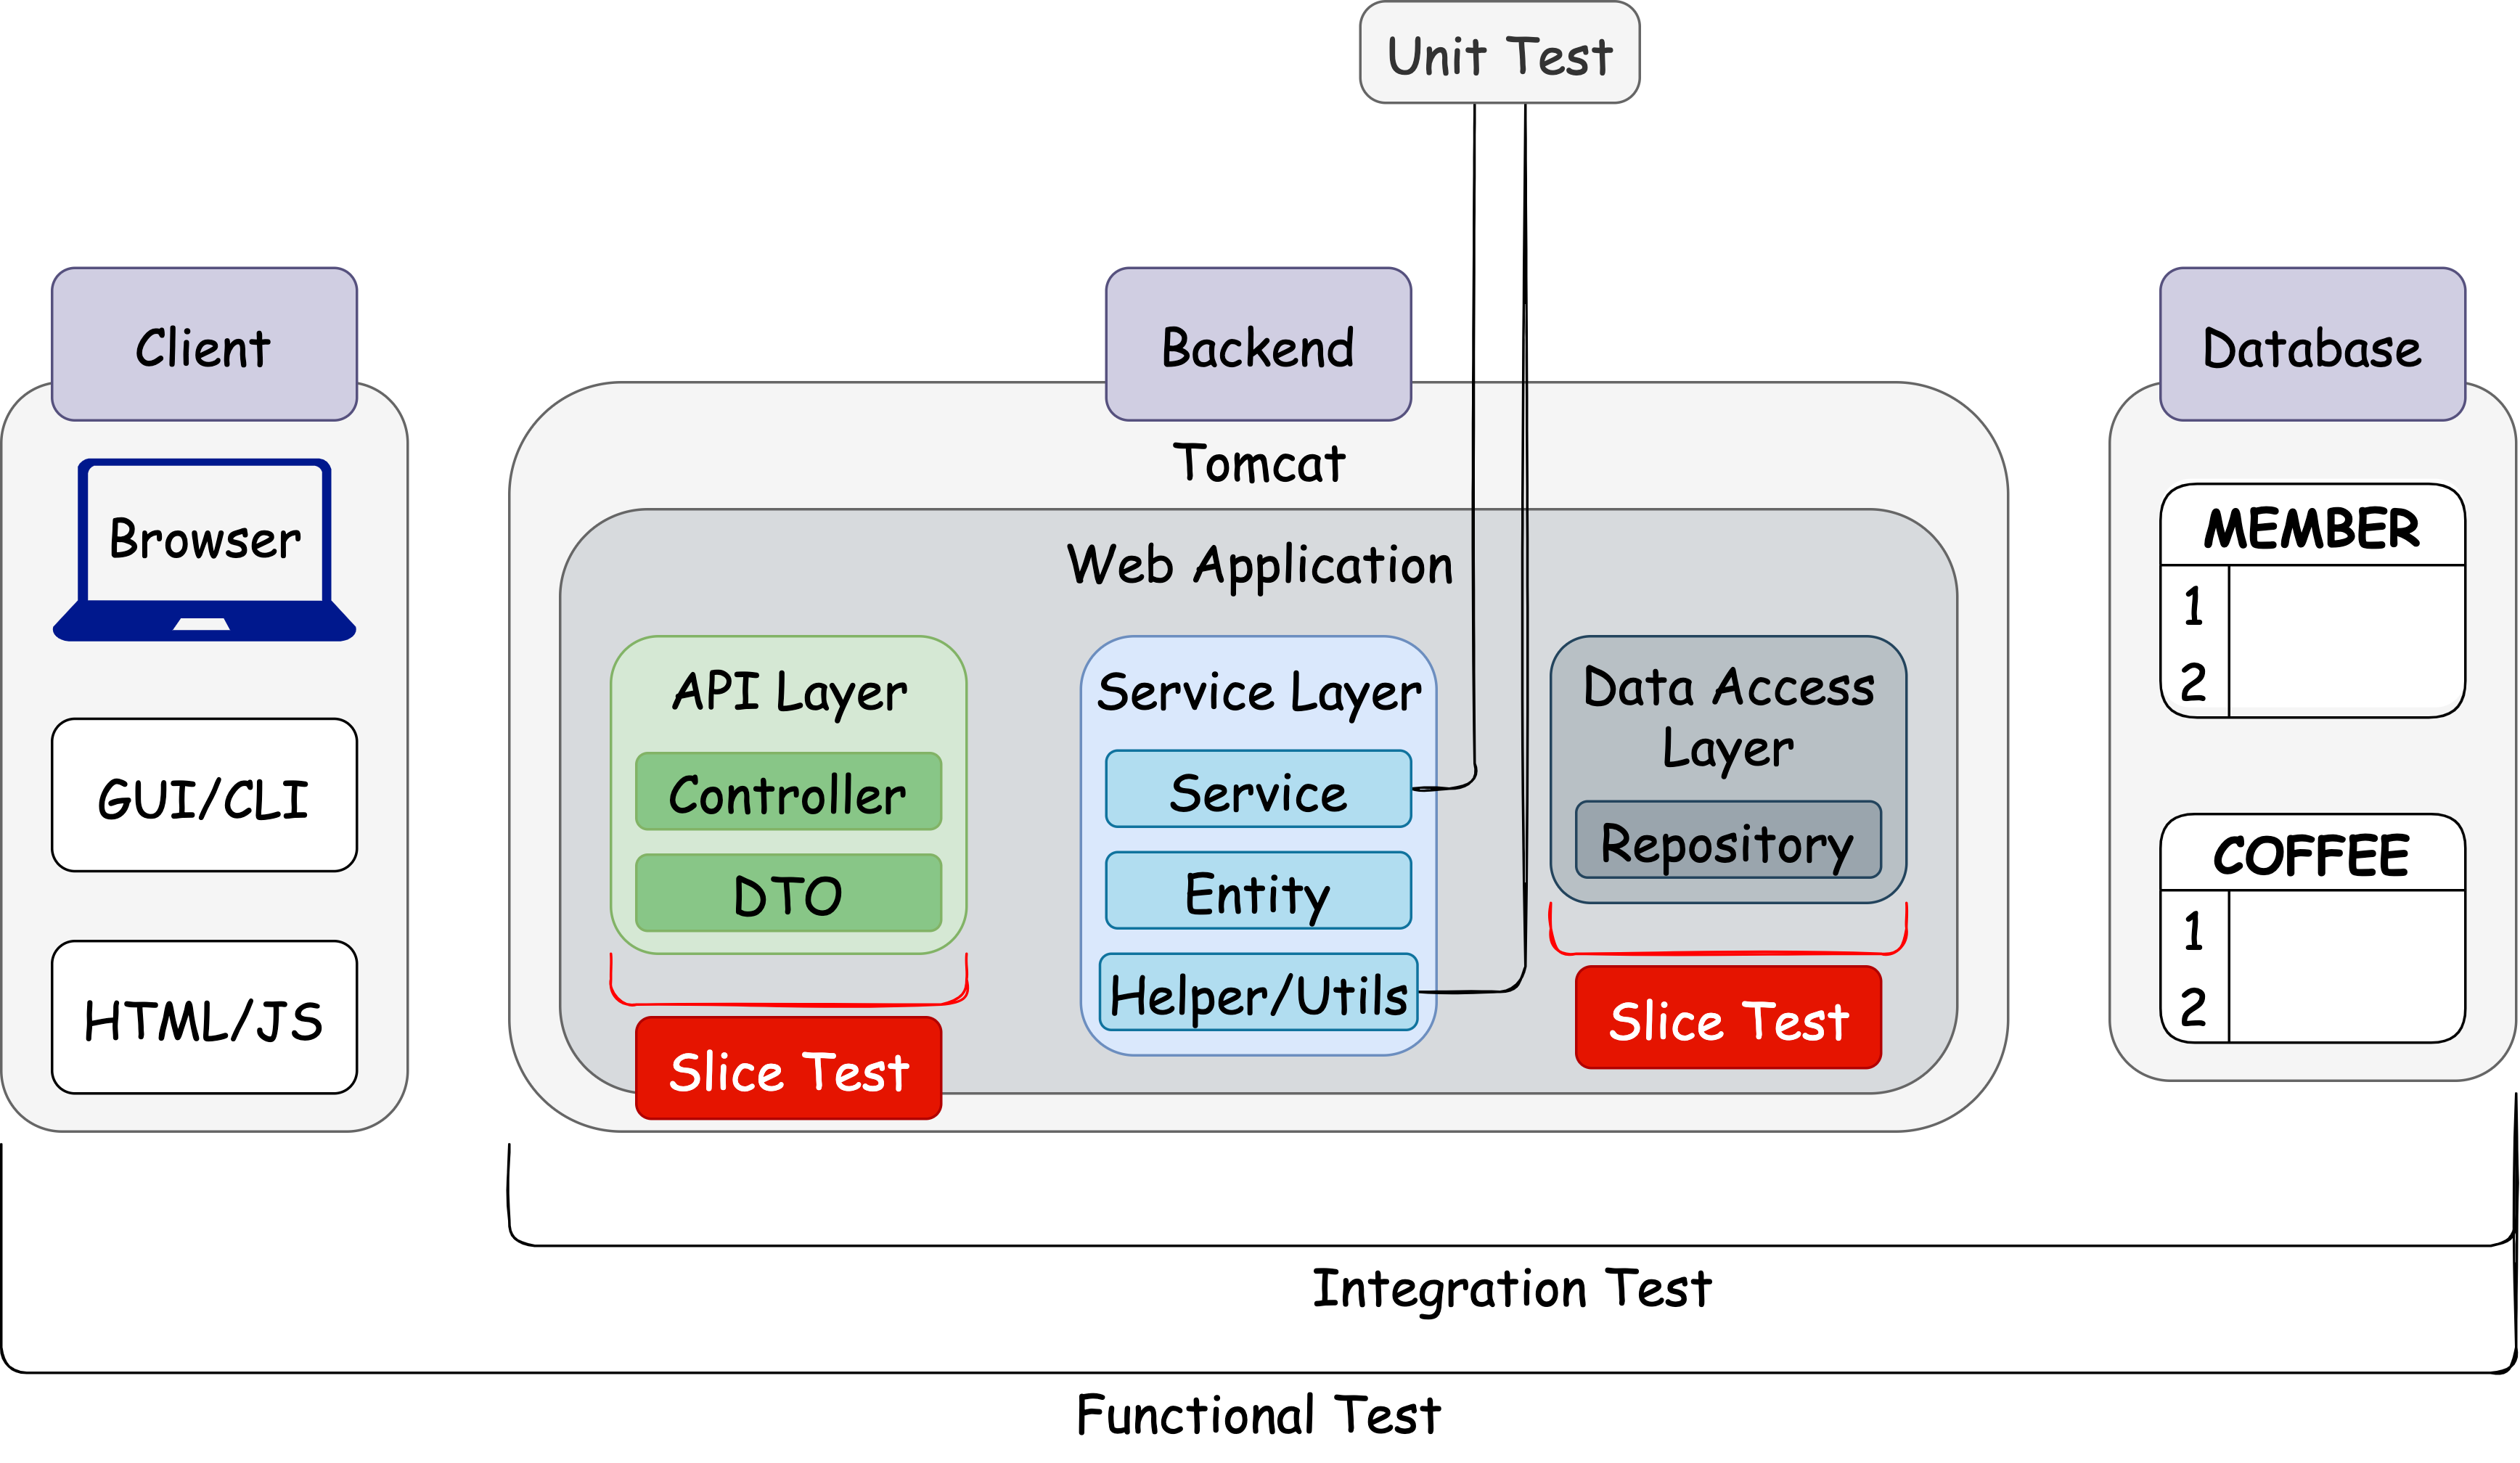
이를 계층별로 구분하면 아래와 같다.

슬라이스 테스트는 애플리케이션을 계층으로 쪼개서 진행하는 테스트를 말한다.
위 그림에선 API, Service, Data Access 계층이 각각 슬라이스 테스트의 대상이 된다.
이번 글에선 먼저 API 계층에 대한 테스트를 알아보자.
API Layer Testing
API 계층의 테스트 대상은 대부분 클라이언트와의 엔드포인트인 Controller 클래스이다.
스프링은 편안하고 효율적으로 Controller 클래스를 테스트하기 위한 여러 가지 방법을 제공한다.
단위 테스트와 마찬가지로 단계별로 알아보자.
Basic Structure of a Controller Testing
import org.junit.jupiter.api.Test;
import org.springframework.beans.factory.annotation.Autowired;
import org.springframework.boot.test.autoconfigure.web.servlet.AutoConfigureMockMvc;
import org.springframework.boot.test.context.SpringBootTest;
import org.springframework.test.web.servlet.MockMvc;

@SpringBootTest       // ApplicationContext(스프링 컨테이너) 생성
@AutoConfigureMockMvc  // 테스트 앱 자동 구성, MockMvc 등 사용 가능
public class ControllerTestDefaultStructure {

    @Autowired
    private MockMvc mockMvc; // 서버 실행 없이 Controller 테스트 가능한 MVC 테스트 프레임워크

    @Test
    public void postMemberTest() { // Controller 클래스에서 테스트 대상 핸들러 메서드 지정
        // given -  테스트를 위한 준비과정 및 전제조건. 테스트용 Request Body 생성

        // when - MockMvc 객체로 테스트 대상 Controller 호출

        // then - 응답으로 수신한 HTTP Status 및 Response Body 검증
    }
}
Given-When-Then에 대한 설명은 지난 글을 참고하자.
2022.09.07 - [개발/Spring] - [Spring]단위 테스트(Unit Test)
[Spring]단위 테스트(Unit Test)
지난 글까진 만들어진 애플리케이션에 트랜잭션을 적용해 보았다. 2022.09.05 - [개발/Spring] - [Spring]트랜잭션(Transaction) 2022.09.06 - [개발/Spring] - [Spring]트랜잭션(Transaction) - @Transactional [..
gnidinger.tistory.com
Testing a MemberController Class
이번엔 실제 테스트 코드를 작성해보자.
먼저 Gson 라이브러리를 사용하기 위해 build.gradle에 의존성을 추가한다.
dependencies {
    ...
	implementation 'com.google.code.gson:gson'
}
계속해서 기본 구조에 내용을 채워 넣는다.
import com.gnidinger.member.dto.MemberDto;
import com.google.gson.Gson;
import org.junit.jupiter.api.Test;
import org.springframework.beans.factory.annotation.Autowired;
import org.springframework.boot.test.autoconfigure.web.servlet.AutoConfigureMockMvc;
import org.springframework.boot.test.context.SpringBootTest;
import org.springframework.http.MediaType;
import org.springframework.test.web.servlet.MockMvc;
import org.springframework.test.web.servlet.MvcResult;
import org.springframework.test.web.servlet.ResultActions;

import static org.springframework.test.web.servlet.request.MockMvcRequestBuilders.post;
import static org.springframework.test.web.servlet.result.MockMvcResultMatchers.status;

@SpringBootTest
@AutoConfigureMockMvc
class MemberControllerTest {
    @Autowired
    private MockMvc mockMvc;

    @Autowired
    private Gson gson;

    @Test
    void postMemberTest() throws Exception {
        // given - Request Body. Gson을 이용해 post 객체를 JSON으로 변환
        MemberDto.Post post = new MemberDto.Post("gni@gmail.com",
                "거니",
                "010-1234-5678");
        String content = gson.toJson(post);


        // when
        ResultActions actions = // MockMvc의 perform()은 ResultActions 타입의 객체 리턴
                mockMvc.perform( // MockMvc로 요청을 전송하기 위해 perform() 호출
                        post("/v11/members") // post()를 통해 POST 메서드와 URI 설정
                                .accept(MediaType.APPLICATION_JSON) // 클라이언트 쪽에서 리턴 받을 응답 타입 JSON으로 설정
                                .contentType(MediaType.APPLICATION_JSON) // JSON Type → Content(서버에서 처리 가능)
                                .content(content) // Request Body 데이터(content) 설정
                );

        // then
        MvcResult result = actions // MockMvc가 리턴한 객체로 검증 수행
                .andExpect(status().isCreated()) // andExpect()를 통해 기대 결과 입력 및 검증
                .andReturn(); // andReturn()으로 Response 데이터 확인 가능

        System.out.println(result.getResponse().getContentAsString());
    }
}
MockMvcRequestBuilders 클래스를 이용해서 Request데이터를 채우고
굉장히 간단하게 핸들러 메서드에 대한 기본적인 검증이 이루어진 것을 확인할 수 있다.
이번엔 한 걸음 더 들어가서 결괏값으로 돌려받는 Response Body를 검증해 보자.
...

class MemberControllerTest {
    ...
        // then
        MvcResult result = actions
                .andExpect(status().isCreated())
                .andExpect(jsonPath("$.data.email").value(post.getEmail()))
                .andExpect(jsonPath("$.data.name").value(post.getName()))
                .andExpect(jsonPath("$.data.phone").value(post.getPhone()))
                .andReturn();

        System.out.println(result.getResponse().getContentAsString());
    }
}
jsonPath() 메서드를 통해 응답으로 받는 email, name, phone 값이 Request Body와 일치하는지 검증하고 있다.
이렇게 @SpringBootTest, @AutoConfigureMockMvc를 이용해 API 계층에 검증 로직을 적용해 보았다.
하지만 지금 진행한 테스트는 엄밀하게 말하면 슬라이스 테스트라고 볼 수 없는데,
위 코드에 따르면 API계층뿐 아니라 애플리케이션 전체의 로직이 실행되기 때문이다.
이 문제는 Mock 객체를 도입하면서 해결되는데, 그 글은 따로 파기로 한다.
'Java+Spring > Spring' 카테고리의 다른 글
| [Spring]테스트에 Mockito 적용 (4) | 2022.09.13 |
|---|---|
| [Spring]도메인 주도 설계(Domain Driven Design, DDD) (2) | 2022.09.10 |
| [Spring]Slice Test - Data Access Layer (2) | 2022.09.09 |
| [Spring]Hamcrest를 적용한 단위 테스트 (2) | 2022.09.08 |
| [Spring]JUnit을 이용한 비즈니스 로직 단위 테스트 (2) | 2022.09.07 |
| [Spring]단위 테스트(Unit Test) (1) | 2022.09.07 |
- Total
- Today
- Yesterday
- 면접 준비
- 스프링
- 남미
- 중남미
- Backjoon
- 세계여행
- 야경
- 지지
- 칼이사
- 유럽
- 맛집
- 리스트
- Algorithm
- 알고리즘
- 자바
- 기술면접
- 유럽여행
- RX100M5
- Python
- a6000
- 스트림
- java
- 여행
- 파이썬
- spring
- BOJ
- 세계일주
- 동적계획법
- 세모
- 백준
| 일 | 월 | 화 | 수 | 목 | 금 | 토 |
|---|---|---|---|---|---|---|
| 1 | 2 | 3 | 4 | 5 | 6 | 7 |
| 8 | 9 | 10 | 11 | 12 | 13 | 14 |
| 15 | 16 | 17 | 18 | 19 | 20 | 21 |
| 22 | 23 | 24 | 25 | 26 | 27 | 28 |
